No edit summary |
(→Trivia) |
||
| (43 intermediate revisions by 11 users not shown) | |||
| Line 1: | Line 1: | ||
| + | {{Tabber/Book|previous=My Hairiest Adventure|next=The Cuckoo Clock of Doom}} |
||
{{Infobox book |
{{Infobox book |
||
| image = <tabber> |
| image = <tabber> |
||
| Line 20: | Line 21: | ||
| pre = ''[[My Hairiest Adventure]]'' |
| pre = ''[[My Hairiest Adventure]]'' |
||
| next = ''[[The Cuckoo Clock of Doom]]'' |
| next = ''[[The Cuckoo Clock of Doom]]'' |
||
| − | |ISBN = ISBN-10: 059048351X |
+ | |ISBN = ISBN-10: 059048351X<br>ISBN-13: 9780590483513 |
| + | }} |
||
| − | ISBN-13: 9780590483513}} |
||
| − | '''''A Night in Terror Tower''''' is the twenty-seventh book in the original [[Goosebumps (original series)|''Goosebumps'']] book series. It was first published in [[1995]]. It was followed-up by a sequel titled ''[[Return to Terror Tower]]'', which is the second special edition in the ''[[Give Yourself Goosebumps]]'' |
+ | '''''A Night in Terror Tower''''' is the twenty-seventh book in the original [[Goosebumps (original series)|''Goosebumps'']] book series. It was first published in [[1995]]. It was followed-up by a sequel titled ''[[Return to Terror Tower]]'', which is the second special edition in the ''[[Give Yourself Goosebumps]]'' gamebook series. |
| − | The illustration shows the [[The Lord High Executioner|Lord High Executioner]] coming down |
+ | The illustration shows the [[The Lord High Executioner|Lord High Executioner]] coming down a flight of stairs holding an axe. |
==Blurb== |
==Blurb== |
||
| Line 32: | Line 33: | ||
==Plot== |
==Plot== |
||
| + | Siblings [[Sue Morgan|Sue]] and [[Eddie Morgan|Eddie]] have been sightseeing in [[Wikipedia:London|London]]. Since their parents are at a conference, the kids are by themselves. The siblings go to Terror Tower, where they are led through the old building in a tour group. |
||
| − | {{CopyWarning|[[Blogger Beware]]}} |
||
| − | [[Sue Morgan|Sue]] and her younger brother, [[Eddie Morgan|Eddie]], are American tourists in [[Wikipedia:London|London]]. They have spent an average day in London, eating burgers, riding in double-decker buses, and visiting old buildings. As the story opens, Sue and Eddie are touring the infamous ominous Terror Tower. Sue did not want to go, but Eddie pleaded with her. Being a good sister, she does take the opportunity to tease him about his tendency to get scared a lot, especially at movies. |
||
| + | The tour guide introduces the group to the "tower room", a place where the prince and princess — Edward and Susannah of York — were locked away. Sue and Eddie inspect the room so intently that they don't realize their tour group has left. They begin descending the tower stairs, but they run into [[The Lord High Executioner|a man who is dressed in black]] — presumably an executioner — and carrying three white stones. The kids dodge the man and begin running down the stairs. The siblings are eventually chased into a tunnel, and the man catches up to them. However, the man is attacked by a swarm of rats, allowing the kids to escape. They find a ladder that takes them out of the tunnel and into Terror Tower's parking lot. |
||
| − | Inside the castle, the guide leads the tourists around the various rooms, showing them empty jail cells and torture chambers. The guide spends a good amount of time introducing the various tools of torture, such as the rack and thumbscrews. Sue wants to take a picture, but she can't find her disposable camera. Her brother produces it from his bag and it is revealed that Eddie is a gifted pickpocket. |
||
| + | The kids are stopped by a guard, and he calls the kids a taxi. The kids are driven to the Barclay Hotel, but — when Sue tries to pay — the driver refuses to accept the strange coins Sue offers. Sue is confused as to why her parents would give her money that wasn't standard. The kids say their parents will pay, and the driver allows them to enter the hotel, telling them he'll catch them if they aren't back in a few minutes. The kids go to the room where they think their parents are staying, but they learn the room is empty. |
||
| − | During the tour, Sue spies a [[Lord High Executioner|man in black]] following their every move through the castle. The tour guide leads the group into a small barred cell and tells them the tragic story of Prince Edward and Princess Susannah of York, two tween royals who were sentenced to death by the King. Sue tries to listen to the story, but gets distracted by Eddie breaking her camera and misses the end of the story. |
||
| + | Sue and Eddie head to the front desk. The man behind the desk says he can help the kids if they provide their last names, but the siblings are unable to remember that. The kids go to the hotel restaurant, but — seeing the taxi driver — walk in, the kids sneak into a dark hallway. Sadly, Eddie and Sue are reunited with the man in black. The man demands that Eddie give something back, and the boy begrudgingly gives back the three stones. Evidently, Eddie had swiped the items when they were in the tunnel. The man places the stones in the palm of his own hand and begins chanting. Suddenly, everything begins to change around the siblings. |
||
| − | Once Sue and Eddie stop bickering about the camera, they realize that the tour has left them behind. They walk out into the steep narrow stairwell and can't hear or see anything. The mysterious man attempts to capture the children. The siblings still aren't quite sure what is going on, but the man is wearing a cape. |
||
| + | The kids find themselves alone in an old hallway with candles on the wall. The siblings hear voices, which they follow. The kids find a crowd of people who are feasting by firelight and dressed in old-fashioned robes. Sue asks a man for help, but he — and, eventually, everyone in the room — begins staring at the siblings in disbelief. A man declares that he recognizes the kids, but the kids run away, confused. |
||
| − | An extended chase down tunnels and sewers follows. Inside the sewer, a wave of rats move in on the humans. The two children think quickly and grab onto the metal rings descending from the ceiling, lifting their bodies up out of the rats. |
||
| + | Once the kids are outside, they find that it is somehow daytime — even though it had been dark when they entered the hotel. The kids also notice that there are no modern buildings or cars. After stopping to ask a local boy for help, Sue turns back to find that her brother is gone. Sue is spotted by the executioner, but she runs away. Sue approaches a woman and pays her — using the same coins from earlier — in exchange for a place to a hide. The woman rushes Sue inside and hides her in a large basket, but the woman promptly ushers the executioner inside and brings him to Sue. The woman also refers to the man as the Lord High Executioner. Since the basket is latched, the executioner is able to transport Sue back to Terror Tower. Soldiers carry Sue to the top room of the tower. There, Sue finds Eddie, and he admits that he was also kidnapped. |
||
| − | Once the rat-tide subsides, the children lower themselves down and escape out into the parking lot. They discover that their tour bus left without them. But luckily the trusty night guard tells them in a thick Scottish burr where to call for a cab. |
||
| + | A man with white hair walks in. The man introduces himself as [[Morgred]], the king's sorcerer. Morgred reveals that Sue and Eddie are Princess Susannah and Prince Edward of York. Morgred sent the kids to the future and wiped their memories to protect them from being executed. The kids' uncle killed their parents and planned on killing them in order to take the throne. Morgred used his three white stones — and the chant, "Movarum, Lovaris, Movaris" — to send the kids to the future, but the Lord High Executioner stole the stones and used them to hunt the duo. While Morgred once again has his stones, he can't send the kids into the future because their uncle would kill him in retaliation. |
||
| − | The cab delivers them to their hotel, where they're sure their parents, who came to London on business, are bound to be back. When the children try to use the money their parents gave them, they discover it is worthless. The cab driver agrees to wait while they run up to their room for the money. Inside their hotel room however, they discover the suite to be empty, with no record of any family having registered. Also, when questioned by the concierge, the children can't even remember their last name. |
||
| + | Edward steals the stones from Morgred and begins performing the chant. After a moment, Susannah notices that they are standing before a tour group. Morgred has also been brought with the kids; they made sure to take him in order to prevent him from being executed. Susannah and Edward agree to call themselves Sue and Eddie respectively; Morgred chooses to call himself Mr. Morgan and will act as the kids' father from then on. |
||
| − | The children dine and dash in the hotel restaurant, fleeing to stiff the taxicab driver as well. Running through the kitchen corridors, the man in black blocks their path. He accosts Eddie and forces him to give up the three white stones he apparently lifted from the man in black earlier. Eddie does so and the man in black uses the stones to bring the children back in time. Yet Sue and Eddie do not realize they have gone back in time and are convinced that the medieval-looking grog shop they have wandered into is an elaborate costume party. Running out of the abbey, Sue loses Eddie and realizes they aren't in the twentieth century anymore. |
||
| − | |||
| − | Sue pays a peasant for a hiding space with the funny money and is shocked to discover that it is actually real gold coins. When the man in black strolls around to the peasant’s hut, the peasant wastes no time turning Sue in. The man in black commands some soldiers to lift the basket into his cart. The peasant apologizes to the basket for turning the girl in, but she just could not go against the man in black, he is the Lord High Executioner. Refusing to defer to the Lord High Executioner, Sue is escorted back to the castle, where Sue is reunited with Eddie. The two are locked tight in a cell, but not before the pale man in black taunts them with the white stones. Once the dignified and potent officer, whose functions are particularly vital leaves, a sorcerer appears. |
||
| − | |||
| − | The white-bearded sorcerer introduces himself as Morgred, the king's personal magician. He reveals that Sue and Eddie are actually Princess Susanna and Prince Edward. Mordred sent them to the future with new memories in order to survive in a new, distant time. But alas, their memories were not complete. Their parents are dead and their uncle, the King, has imprisoned them to await their death. Morgred used the magic stone balls to send the two children as far into the future as possible and gave them false memories. |
||
| − | |||
| − | The children try to make a break for it out the open cell door, but Morgred bewitches the children and they freeze in place. He apologizes with tears in his eyes, but if he lets the children escape, the king will kill him. As Morgred keeps wailing, Eddie reveals to Sue that he has swiped the stones yet again. Remembering the ancient Latin words Mordred used to cast the spell, the two cast themselves back into the present. |
||
| − | |||
| − | Back on the tour, they finally hear the rest of their story: On the night of the execution, the children mysteriously disappeared. A bearded man joins the children and thanks them for bringing him with them. Morgred asks for the children to call him Mr. Morgan since he will be his new father and offers to cast a food spell to cure their hunger. The book ends, as Sue wittily replies that they had enough spells for a lifetime and asks them if they would want any burgers instead. |
||
==Reprints and rereleases== |
==Reprints and rereleases== |
||
| Line 93: | Line 85: | ||
===Differences=== |
===Differences=== |
||
*The ''Classic Goosebumps'' reprint was released as a tie-in to the twelfth ''[[Goosebumps HorrorLand]]'' book, ''[[The Streets of Panic Park]]''. |
*The ''Classic Goosebumps'' reprint was released as a tie-in to the twelfth ''[[Goosebumps HorrorLand]]'' book, ''[[The Streets of Panic Park]]''. |
||
| + | **The ''Classic Goosebumps'' reprint also changes ''the twentieth century ''into ''the twenty-first century''. |
||
==International releases== |
==International releases== |
||
| Line 101: | Line 94: | ||
<gallery bordercolor="#007a00" hideaddbutton="true"> |
<gallery bordercolor="#007a00" hideaddbutton="true"> |
||
A Night in Terror Tower - UK Cover.jpg|UK |
A Night in Terror Tower - UK Cover.jpg|UK |
||
| ⚫ | |||
| ⚫ | |||
| − | Anightinterrortower- |
+ | Anightinterrortower-frenchcanadian.jpg|French(Canadian) (Les Pierres Magiques - "The Magic Stones") |
| + | Anightinterrortower-french.jpg|French(European) (Ver. 1) (La Tour de la Terreur - "The Tower of Terror") |
||
| ⚫ | |||
| − | A Night in Terror Tower - |
+ | A Night in Terror Tower - French Cover - La Tour de la terreur 1.jpg|French(European) (Ver. 2) |
| ⚫ | |||
| ⚫ | |||
| ⚫ | |||
| − | Anightinterrortower-german.jpg|German |
||
| − | Anightinterrortower- |
+ | Anightinterrortower-german.jpg|German (Die Nacht im Turm der Schrecken - "The Night in the Tower of Horrors") |
| + | Anightinterrortower-greek.jpg|Greek (ΜΙΑ ΝΥΧΤΑ ΣΤΟΝ ΠΥΡΓΟ ΤΟΥ ΤΡΟΜΟΥ - "A Night at the Terror Tower") |
||
| − | A Night in Terror Tower - French Cover - La Tour de la terreur 1.jpg|French (Ver. 2) |
||
| ⚫ | |||
| ⚫ | |||
| ⚫ | |||
| ⚫ | |||
| − | Anightinterrortower-frenchcanadian.jpg|Canadian (French) |
||
| ⚫ | |||
| − | Anightinterrortower-russian.jpg|Russian |
||
Anightinterrortower-persian.jpg|Persian |
Anightinterrortower-persian.jpg|Persian |
||
| + | Anightinterrortower-russian.jpg|Russian (НОЧЬ В БАШНЕ УЖАСА - "Night in the Tower of Horror") |
||
| + | A Night in Terror Tower - Spanish Cover - Noche En La Torre Del Terror 1.jpg|Spanish(European) (Noche en la Torre del Terror - "Night at the Tower of Terror") |
||
| ⚫ | |||
A Night in Terror Tower - Spanish Cover - Una Noche En La Torre Del Terror 3.jpg|Spanish (''Classic Goosebumps'') |
A Night in Terror Tower - Spanish Cover - Una Noche En La Torre Del Terror 3.jpg|Spanish (''Classic Goosebumps'') |
||
</gallery> |
</gallery> |
||
| Line 120: | Line 113: | ||
=== Differences === |
=== Differences === |
||
| + | *In the UK, this is the twenty-fifth book in the original series. |
||
* In the Portuguese adaptation of the story there are some notable differences: |
* In the Portuguese adaptation of the story there are some notable differences: |
||
| − | ** Sue and Eddie Morgan are called 'Susana and Eduardo Matoso' |
+ | ** Sue and Eddie Morgan are called 'Susana and Eduardo Matoso'. |
| − | ** The Lord High Executioner is called 'Lorde Carrasco-Mor' |
+ | ** The Lord High Executioner is called 'Lorde Carrasco-Mor'. |
| + | |||
| + | ==Merchandise== |
||
| + | <gallery bordercolor="#007a00" hideaddbutton="true"> |
||
| + | Screenshot 2017-09-20 at 12.08.27 PM.png|Collectible Figurine of the Lord High Executioner |
||
| + | Goosebumps-boardgame-anightinterrortower.png|Board game based on the book |
||
| + | TerrorTowerBack.png|Board game (Back) |
||
| + | Nightinterrortowermicroplayset.jpg|Microverse Playset (Front) |
||
| + | NITTMicroverse.jpg|Microverse Playset (Back) |
||
| + | Executioner-3dpaint-kit.png|3-D paint kit of the Lord High Executioner |
||
| + | Creepyco-pin-anightinterrortower.jpg|Enamel pin from Creepy Co. |
||
| + | Creepyco-pin-packaging-anightinterrortower.png|Enamel pin from Creepy Co. (Unpackaged) |
||
| + | TerrorTowerHanger.jpg|Doorknob hanger |
||
| + | TerrorScreamMachine.png|Pocket Scream Machine |
||
| + | TerrorTowerGraph.jpg|Lithograph |
||
| + | 27 Night in Terror Tower 1995 Tazo f+b.jpg|1995 Tazo |
||
| + | 27 Ive Survived Terror Tower 1998 pinback button.jpg|1998 I've Survived Terror Tower pinback button |
||
| + | </gallery> |
||
==Adaptations== |
==Adaptations== |
||
| Line 146: | Line 157: | ||
| style="text-align: center;" |Ted Kryczko |
| style="text-align: center;" |Ted Kryczko |
||
| style="text-align: center;" |Walt Disney Records |
| style="text-align: center;" |Walt Disney Records |
||
| + | |- |
||
| + | |[[File:27 Night in Terror Tower UK Audiobook front.jpg|center|150px]] |
||
| + | | style="text-align: center;" |February 1998 <br> (UK release) |
||
| + | | style="text-align: center;" |60 minutes |
||
| + | | style="text-align: center;" | |
||
| + | | style="text-align: center;" |Abbey Home Media Group PLC |
||
|} |
|} |
||
| + | |||
| + | ==Advertisement== |
||
| + | <gallery widths="235" bordercolor="transparent" spacing="small" hideaddbutton="true"> |
||
| + | OS 27 A Night in Terror Tower bookad from OS26.jpg|Book advertisement from ''[[My Hairiest Adventure]]''. |
||
| + | </gallery> |
||
==Artwork== |
==Artwork== |
||
| Line 155: | Line 177: | ||
==Trivia== |
==Trivia== |
||
| + | *When the ''[[Classic Goosebumps]]'' version of this book was printed, the cover art was erroneously mirrored. |
||
*The premise of two heirs to the English throne mysteriously vanishing is actually based on true events. In 1483, [http://en.wikipedia.org/wiki/Richard_III Richard III] placed his two nephews, [http://en.wikipedia.org/wiki/Edward_V Edward V] and [http://en.wikipedia.org/wiki/Richard_of_Shrewsbury,_1st_Duke_of_York Richard, Duke of York], in the [http://en.wikipedia.org/wiki/Tower_of_London Tower of London] (then a palace) and were never seen again. It is not known what happened to the two young princes, but most rumors say they were killed. |
*The premise of two heirs to the English throne mysteriously vanishing is actually based on true events. In 1483, [http://en.wikipedia.org/wiki/Richard_III Richard III] placed his two nephews, [http://en.wikipedia.org/wiki/Edward_V Edward V] and [http://en.wikipedia.org/wiki/Richard_of_Shrewsbury,_1st_Duke_of_York Richard, Duke of York], in the [http://en.wikipedia.org/wiki/Tower_of_London Tower of London] (then a palace) and were never seen again. It is not known what happened to the two young princes, but most rumors say they were killed. |
||
*According to [[R.L. Stine]], early drafts of the book featured many more scenes where the protagonists were running away. Stine's editors thought that was "boring" and that the characters should occasionally stop to catch their breath. As a result, Stine reworked the book to feature less running. |
*According to [[R.L. Stine]], early drafts of the book featured many more scenes where the protagonists were running away. Stine's editors thought that was "boring" and that the characters should occasionally stop to catch their breath. As a result, Stine reworked the book to feature less running. |
||
| + | *According to [[Tim Jacobus]], this was one of his least favorite covers due to it being rushed. |
||
| + | *The concept of someone from the past being sent to the present to protect them from being killed would later be used in an episode of ''[[Wikipedia:The Haunting Hour: The Series|R. L. Stine's The Haunting Hour: The Series]]'', called ''Night of the Mummy.'' |
||
| + | *This is the first ''Goosebumps'' book to feature time travel. Coincidentally, time travel would also be the central plot of in the next book, ''[[The Cuckoo Clock of Doom]]''. |
||
| + | *This is the only book in the original series to get a ''[[Give Yourself Goosebumps]]'' sequel. |
||
===References in other ''Goosebumps'' media=== |
===References in other ''Goosebumps'' media=== |
||
*The Lord High Executioner appears as a background monster in the [[Goosebumps (film)|''Goosebumps'' film]]. |
*The Lord High Executioner appears as a background monster in the [[Goosebumps (film)|''Goosebumps'' film]]. |
||
| + | * A book called "Terror Tower" appears on a shelf in ''[[Monsters at Midnight]]''. |
||
| + | * The Lord High Executioner appears in ''[[Goosebumps HorrorTown]]''. |
||
| + | |||
{{GoosebumpsOS}} |
{{GoosebumpsOS}} |
||
[[Category:Goosebumps (television series)]] |
[[Category:Goosebumps (television series)]] |
||
| + | [[Category:Terror Tower Books]] |
||
[[Category:Magic]] |
[[Category:Magic]] |
||
[[Category:Time Travel]] |
[[Category:Time Travel]] |
||
| Line 171: | Line 202: | ||
[[Category:Covers by Tim Jacobus]] |
[[Category:Covers by Tim Jacobus]] |
||
[[Category:Classic Goosebumps]] |
[[Category:Classic Goosebumps]] |
||
| − | [[Category:Human |
+ | [[Category:Human villains (topic)]] |
| + | [[Category:Books with Video Game Monsters]] |
||
| + | [[Category:Covers by Brandon Dorman]] |
||
Revision as of 21:28, 14 February 2020
A Night in Terror Tower is the twenty-seventh book in the original Goosebumps book series. It was first published in 1995. It was followed-up by a sequel titled Return to Terror Tower, which is the second special edition in the Give Yourself Goosebumps gamebook series.
The illustration shows the Lord High Executioner coming down a flight of stairs holding an axe.
Blurb
All Locked Up and No Place to Go!
Sue and her brother, Eddie, are visiting London when they run into a little problem. They can't find their tour group. Still, there's no reason to panic. No way their tour guide would just leave them. All alone. In a gloomy old prison tower. No way they'd get locked inside. After dark. With those eerie sounds. And a strange dark figure who wants them...dead.
Plot
Siblings Sue and Eddie have been sightseeing in London. Since their parents are at a conference, the kids are by themselves. The siblings go to Terror Tower, where they are led through the old building in a tour group.
The tour guide introduces the group to the "tower room", a place where the prince and princess — Edward and Susannah of York — were locked away. Sue and Eddie inspect the room so intently that they don't realize their tour group has left. They begin descending the tower stairs, but they run into a man who is dressed in black — presumably an executioner — and carrying three white stones. The kids dodge the man and begin running down the stairs. The siblings are eventually chased into a tunnel, and the man catches up to them. However, the man is attacked by a swarm of rats, allowing the kids to escape. They find a ladder that takes them out of the tunnel and into Terror Tower's parking lot.
The kids are stopped by a guard, and he calls the kids a taxi. The kids are driven to the Barclay Hotel, but — when Sue tries to pay — the driver refuses to accept the strange coins Sue offers. Sue is confused as to why her parents would give her money that wasn't standard. The kids say their parents will pay, and the driver allows them to enter the hotel, telling them he'll catch them if they aren't back in a few minutes. The kids go to the room where they think their parents are staying, but they learn the room is empty.
Sue and Eddie head to the front desk. The man behind the desk says he can help the kids if they provide their last names, but the siblings are unable to remember that. The kids go to the hotel restaurant, but — seeing the taxi driver — walk in, the kids sneak into a dark hallway. Sadly, Eddie and Sue are reunited with the man in black. The man demands that Eddie give something back, and the boy begrudgingly gives back the three stones. Evidently, Eddie had swiped the items when they were in the tunnel. The man places the stones in the palm of his own hand and begins chanting. Suddenly, everything begins to change around the siblings.
The kids find themselves alone in an old hallway with candles on the wall. The siblings hear voices, which they follow. The kids find a crowd of people who are feasting by firelight and dressed in old-fashioned robes. Sue asks a man for help, but he — and, eventually, everyone in the room — begins staring at the siblings in disbelief. A man declares that he recognizes the kids, but the kids run away, confused.
Once the kids are outside, they find that it is somehow daytime — even though it had been dark when they entered the hotel. The kids also notice that there are no modern buildings or cars. After stopping to ask a local boy for help, Sue turns back to find that her brother is gone. Sue is spotted by the executioner, but she runs away. Sue approaches a woman and pays her — using the same coins from earlier — in exchange for a place to a hide. The woman rushes Sue inside and hides her in a large basket, but the woman promptly ushers the executioner inside and brings him to Sue. The woman also refers to the man as the Lord High Executioner. Since the basket is latched, the executioner is able to transport Sue back to Terror Tower. Soldiers carry Sue to the top room of the tower. There, Sue finds Eddie, and he admits that he was also kidnapped.
A man with white hair walks in. The man introduces himself as Morgred, the king's sorcerer. Morgred reveals that Sue and Eddie are Princess Susannah and Prince Edward of York. Morgred sent the kids to the future and wiped their memories to protect them from being executed. The kids' uncle killed their parents and planned on killing them in order to take the throne. Morgred used his three white stones — and the chant, "Movarum, Lovaris, Movaris" — to send the kids to the future, but the Lord High Executioner stole the stones and used them to hunt the duo. While Morgred once again has his stones, he can't send the kids into the future because their uncle would kill him in retaliation.
Edward steals the stones from Morgred and begins performing the chant. After a moment, Susannah notices that they are standing before a tour group. Morgred has also been brought with the kids; they made sure to take him in order to prevent him from being executed. Susannah and Edward agree to call themselves Sue and Eddie respectively; Morgred chooses to call himself Mr. Morgan and will act as the kids' father from then on.
Reprints and rereleases
| Book | Release date | Type | Media |
|---|---|---|---|
2003 - 2007 reprint series 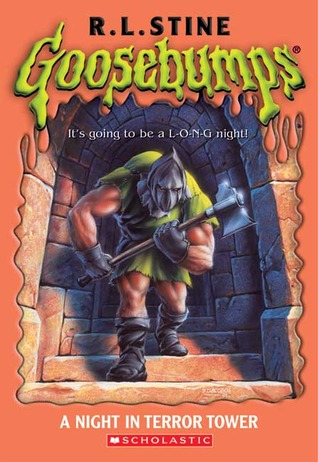 |
August 2004 | Standalone | Paperback |
 |
December 2009 | Standalone | Paperback |
 |
September 26th, 2017 | Collection | Paperback |
Differences
- The Classic Goosebumps reprint was released as a tie-in to the twelfth Goosebumps HorrorLand book, The Streets of Panic Park.
- The Classic Goosebumps reprint also changes the twentieth century into the twenty-first century.
International releases
| Gallery | |
|---|---|
") UK ") Danish (Rædselstårnet - "Terror Tower") ") French(Canadian) (Les Pierres Magiques - "The Magic Stones") ") French(European) (Ver. 1) (La Tour de la Terreur - "The Tower of Terror") ") French(European) (Ver. 2) ") French(European) (Ver. 3) ") French(European) (Ver. 4) ") German (Die Nacht im Turm der Schrecken - "The Night in the Tower of Horrors") ") Greek (ΜΙΑ ΝΥΧΤΑ ΣΤΟΝ ΠΥΡΓΟ ΤΟΥ ΤΡΟΜΟΥ - "A Night at the Terror Tower") ") Hebrew (לילה בטירת האימה - "Night in the Horror Castle") ") Italian (I Prigionieri della Torre -"The Prisoners of the Tower") ") Persian ") Russian (НОЧЬ В БАШНЕ УЖАСА - "Night in the Tower of Horror") ") Spanish(European) (Noche en la Torre del Terror - "Night at the Tower of Terror") ") Spanish(Mexican) (Una Noche en la Torre del Terror - "A Night at the Tower of Terror") ") Spanish (Classic Goosebumps) | |
Differences
- In the UK, this is the twenty-fifth book in the original series.
- In the Portuguese adaptation of the story there are some notable differences:
- Sue and Eddie Morgan are called 'Susana and Eduardo Matoso'.
- The Lord High Executioner is called 'Lorde Carrasco-Mor'.
Merchandise
")
")
")
")
")
")
")
")
")
")
")
")
")
Adaptations
TV series
A Night in Terror Tower was adapted into a two-part episode of the Goosebumps TV series. It is the sixteenth (part one) and seventieth (part two) episode of season one.
")
Audiobook
| Audiobook | Release date | Length | Narrated by | Published by |
|---|---|---|---|---|
 |
November 1996 | 60 minutes | Ted Kryczko | Walt Disney Records |
 |
February 1998 (UK release) |
60 minutes | Abbey Home Media Group PLC |
Advertisement
")
Artwork
")
_-_artwork.jpg "A Night in Terror Tower (Classic Goosebumps) - artwork.jpg (174 KB)")
Trivia
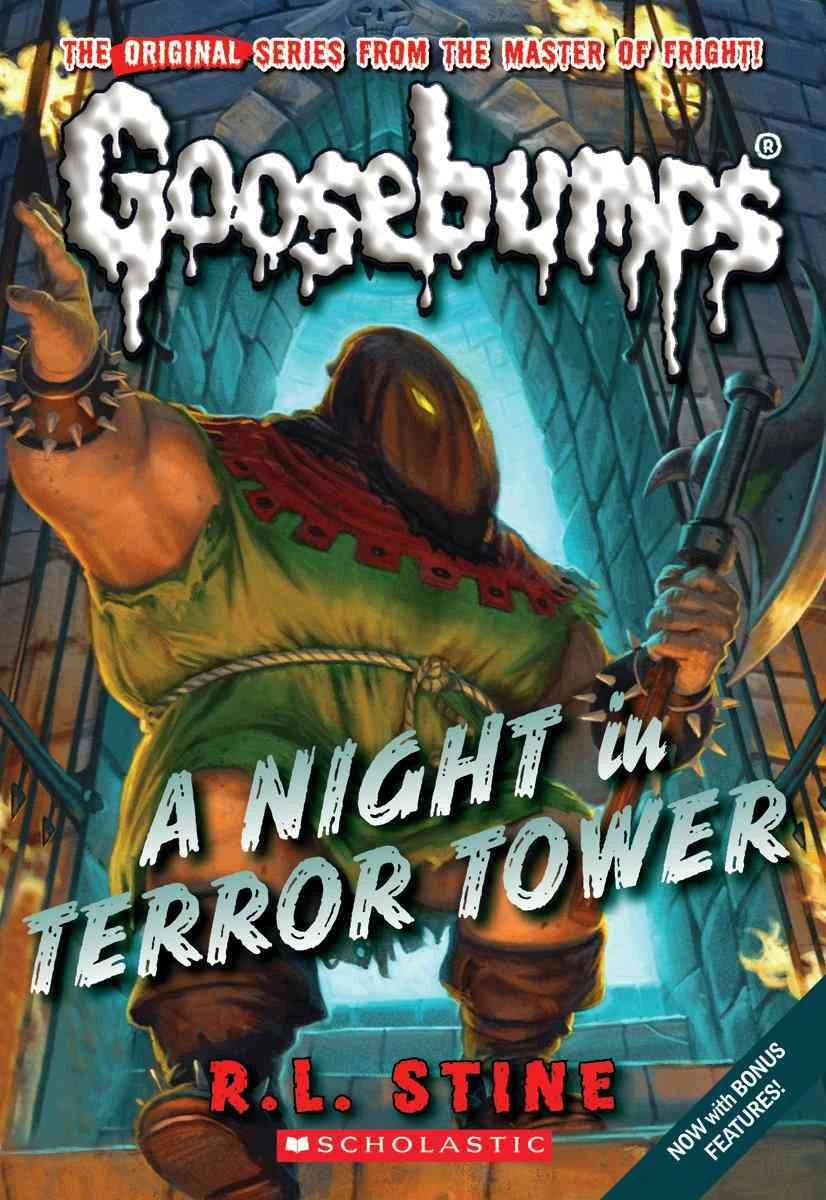
- When the Classic Goosebumps version of this book was printed, the cover art was erroneously mirrored.
- The premise of two heirs to the English throne mysteriously vanishing is actually based on true events. In 1483, Richard III placed his two nephews, Edward V and Richard, Duke of York, in the Tower of London (then a palace) and were never seen again. It is not known what happened to the two young princes, but most rumors say they were killed.
- According to R.L. Stine, early drafts of the book featured many more scenes where the protagonists were running away. Stine's editors thought that was "boring" and that the characters should occasionally stop to catch their breath. As a result, Stine reworked the book to feature less running.
- According to Tim Jacobus, this was one of his least favorite covers due to it being rushed.
- The concept of someone from the past being sent to the present to protect them from being killed would later be used in an episode of R. L. Stine's The Haunting Hour: The Series, called Night of the Mummy.
- This is the first Goosebumps book to feature time travel. Coincidentally, time travel would also be the central plot of in the next book, The Cuckoo Clock of Doom.
- This is the only book in the original series to get a Give Yourself Goosebumps sequel.
References in other Goosebumps media
- The Lord High Executioner appears as a background monster in the Goosebumps film.
- A book called "Terror Tower" appears on a shelf in Monsters at Midnight.
- The Lord High Executioner appears in Goosebumps HorrorTown.